Important: Read all of the instructions before installing the Pump Start Relay. Follow all local wiring codes and requirements. Have a qualified electrician install the relay if there are any questions about the requirements for proper installation.
1. Selecting a location #
Turn off the power at the main circuit breaker panel and attach an appropriate safety lockout device. The pump may require a dedicated circuit. Do not have the pump and sprinkler controller on the same circuit.
Determine the desired location for the Pump Start Relay box. It should be mounted 5 feet away from the sprinkler controller. The sprinkler controller should be mounted at least 12 feet away from the pump. To help prevent overheating the Pump Start Relay box should not be mounted in direct sunlight.
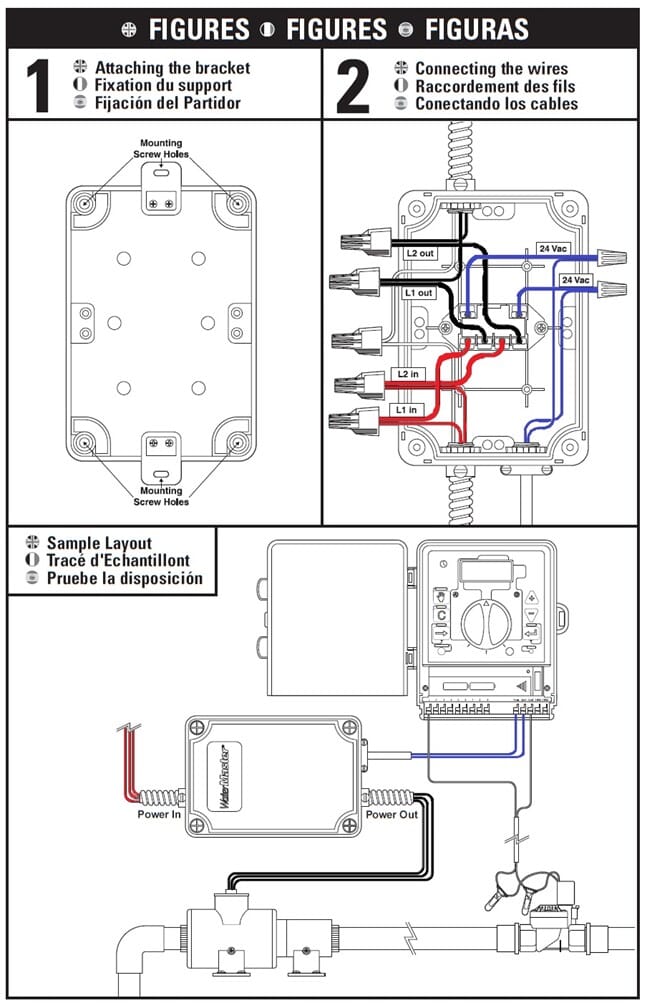
2. Attaching the bracket #
Attach the mounting clips to the back of the relay box using the screws included.
3. Connect the wires #
Unscrew the four screws located on the corners of the box to remove the relay box cover. Determine the desired location for the incoming AC power wires, the location for the wires to the pump, and the location for the wires to the controller.
Use a screwdriver and hammer to remove the desired conduit knockout plugs. Attach the relay box to the wall using either the mounting template or the corner holes with the No. 8 screws. Use expanding anchors in plaster or masonry. Up to six screws can be used for mounting the relay box. Attach the appropriate conduit fittings to the box (Follow local code requirements).
Run the AC wires of AWG 12 with a temperature rating of 155º F/68º C into the relay box and connect them to the appropriate relay wires. The wires are labeled “power in” from main power source, and “power out” to pump (refer to diagram on housing unit). Use the wire nuts provided to make the connection. Make sure there is no bare wire exposed. Connect the ground wires.
Run the sprinkler controller wires of AWG 16-24 (155º F/68º C) into the box and connect them to the relay wires labeled 24V. Use wire nuts to make the connections.
Re-inspect each connection to ensure the wires are properly connected.
4. Re-install the box cover #
Tighten the screws until they are snug, but do not over tighten or the screws may break.
5. Connect the sprinkler controller #
Connect the sprinkler controller wires to the controller by connecting one wire to the terminal labeled “Pump” or “Master Valve”. The other wire should be connected to the terminal label “Com” or “Common”.
6. Test the System #
Turn the power back on and test the system.
Warnings: #
Always shut off the power supply before opening the relay box cover! Never open the relay box cover when it is raining! Do not exceed the maximum recommended voltage or horsepower rating (2HP at 240V, or 1HP at 120V)! Do not exceed the coil maximum recommended voltage of 30 VAC!
Notes: #
Relays create an electromagnetic field that can interfere with other electronics, install at least 5ft. from controllers and 15ft from pumps.
Hydro-Rain HRC 100 Controllers have a 300-mA output and the Hydro-Rain PSR (Pump Start Relay) requires 75 mA.


